 An engaged email list is key to selling your online course.
The mechanics of it, though, get many would-be teachers stalled. In this post, you'll find an index to the pieces and a roadmap to work steps.
You've got this–and your business can truly move forward when you're building your email list.
ALL THE PIECES
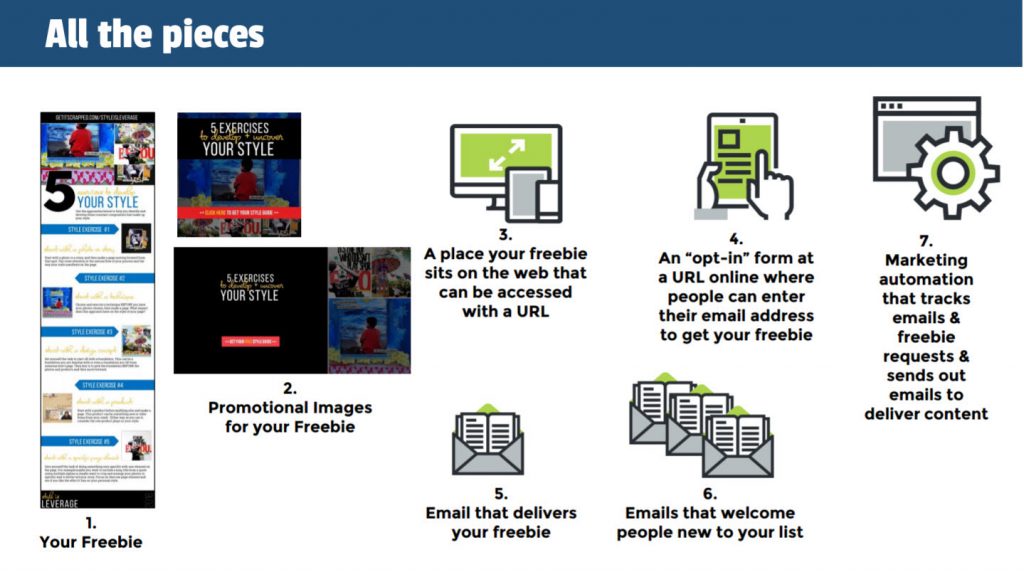
1. YOUR LEAD MAGNET
 First you’ll need your list-building freebie. This should be something that gives your prospects a quick win–and that precedes a need for your paid training.
For this first one, I recommend you make a 5-things or 5-ways or 5-tools kind of listable.
Here's an example of one we're using at my other site, Get It Scrapped, as a lead-in to our Style is Leverage class.
Once you've made your lead magnet, export it to both pdf and jpg formats.
2. PROMOTIONAL IMAGES
In addition to that freebie, you can make images for promoting the freebie–images you can share on social media.
Getting people to sign up is often referred to as opting in. You’ll want images that clearly convey (along with the text you might add alongside them) what people get and how they can get it. That might be to enter their email address right on the same spot or it might be to click in order to enter their email address.
Here are examples for a course on starting a cake business or a course on meditation for beginners.
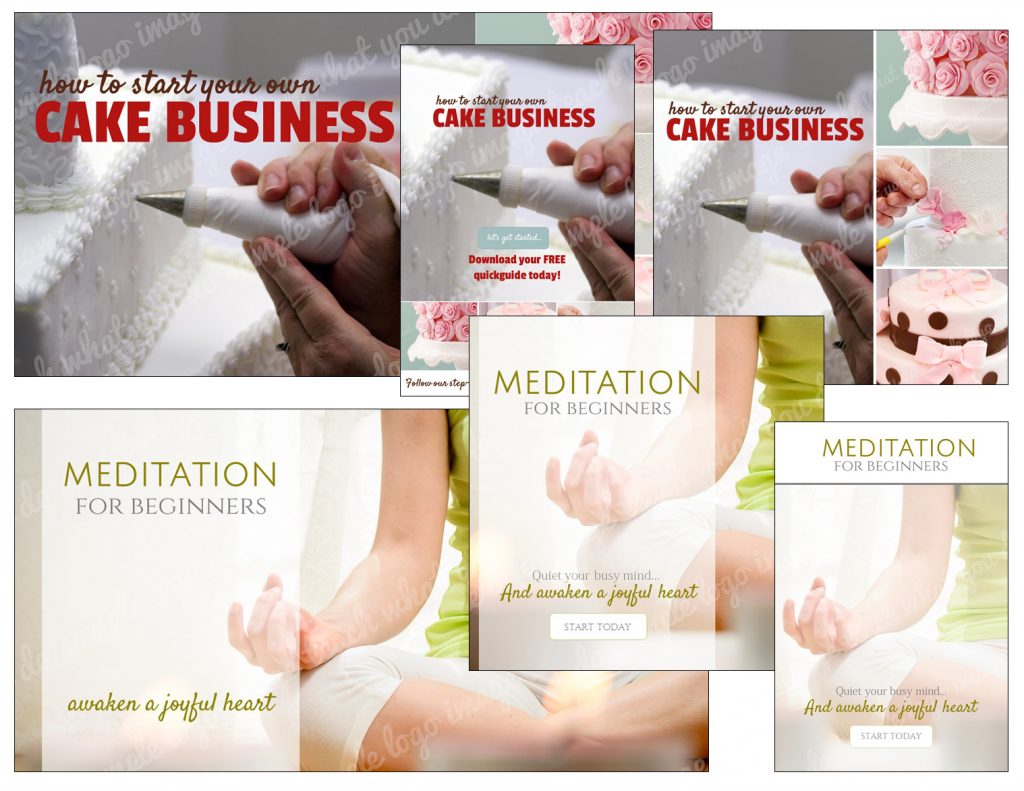
Decide what images you need—or if you need any. Keep the text on the image to a minimum. I like to name a benefit and include a call to action for the viewer to get my freebie and, thereby, its benefit.
3. A PLACE FOR YOUR FREEBIE TO SIT ON THE WEB (a URL)
Next you need a place to house the freebie file. My top 3 recommendations for this are:
- if you have a blog or website that lets you upload pdf and jpg files and link to them use the MEDIA UPLOADS area to do this; or
- if you know how to upload files to your server with FTP, you can put them into a public folder that you use for freebies; or
- you can use the Amazon S3 service to upload files.
Get the URL (the address on the internet) that you can use to share the file. You’ll link to this URL when you share the freebie – make sure that others who are not logged into your server or storage area can access the file. For example, with Amazon S3 this means setting permissions to public.
When you share the freebie, you can link directly to this URL or you could make a blog or landing page where you show the jpg file and link to the pdf.
4. OPT IN FORM
With your freebie created and housed online, you now need a way for leads to request your freebie. This is often called an opt-in or an email form. It could be a spot on your website, maybe over in the sidebar when people can enter their email address. It can be a webpage made just for the purpose of accepting email addresses for those requesting the freebie. This optin or form is usually made with your email service (for example ActiveCampaign or ConvertKit or Drip).
5. EMAIL THAT DELIVERS YOUR FREEBIE
Write an email message for delivering the freebie that includes a link to the URL where you've linked it up. You’ll set up this email on your email service.
6. EMAIL THAT WELCOMES NEW PROSPECTS
You should also set up an email welcome series that goes out to anyone new on your list.
With EMAIL #1, offer a “Hi” and a welcome. Tell people what to expect from you via email and ask that they whitelist your email address. You can also ask for a follow on me social media—and tease email #2
With EMAIL #2, you’ll Engage for a 2nd day. Share something useful again—something that completes the tease from the day before. Encourage that future emails be opened.
With EMAIL #3, deliver a final useful tip/lesson/resource/ or idea. Remind readers what to expect they’ll get from you. Again, ask to be whitelisted and followed on social media.
7. MARKETING AUTOMATION
The final piece of this is the email automation that you set up with your email service. This is the series of triggers that send out your emails (which link to the freebie) and get your new prospect onboarded and set up for receiving future communications. This will vary depending upon your email service provider.
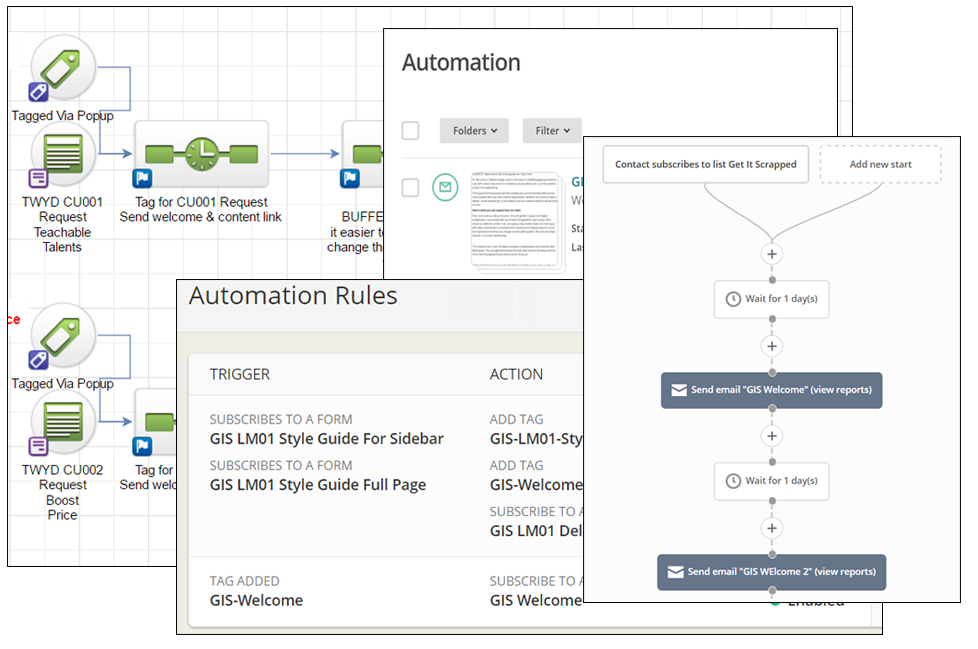
Here's the general process for ActiveCampaign
- Set up your email LIST. (With Active Campaign you can have multiple lists. Use ONE list for one business.)
- Add a TAG to your LIST for the freebie you're offering and a TAG for someone who is new to the list.
- Create an opt-in FORM and set it to add the TAG for the freebie to any CONTACT who fills out the form.
- Put the code to display the FORM on your website.
- Write the EMAIL for delivering the freebie.
- Write the EMAILs for welcoming new contacts.
- Create an AUTOMATION to deliver the EMAIL with the link to the freebie. (Set the AUTOMATION to start when the TAG for the freebie is added to a contact.)
- Create an AUTOMATION to deliver the EMAIL welcome series starting the next day. (Set the AUTOMATION to start when the TAG for a new contact is added to a contact.)
- Test
Here's the general process for ConvertKit
- Set up your email LIST. (With ConvertKit, you can have just one list. If you have two businesses, use a TAG to differentiate contacts for each.)
- Create a TAG for the freebie you're offering and a TAG for a new contact to the company list.
- Create an opt-in FORM.
- Add the code for the form to your website. If you're using WordPress, you can use a ConvertKit plugin.
- Create an EMAIL SEQUENCE to send out an email with a link to the lead magnet.
- Create and EMAIL SEQUENCE to send out emails welcoming new contacts.
- Create AUTOMATION RULES for triggering the EMAIL SEQUENCES (one to deliver the lead magnet and one to welcome new contacts.
- Test
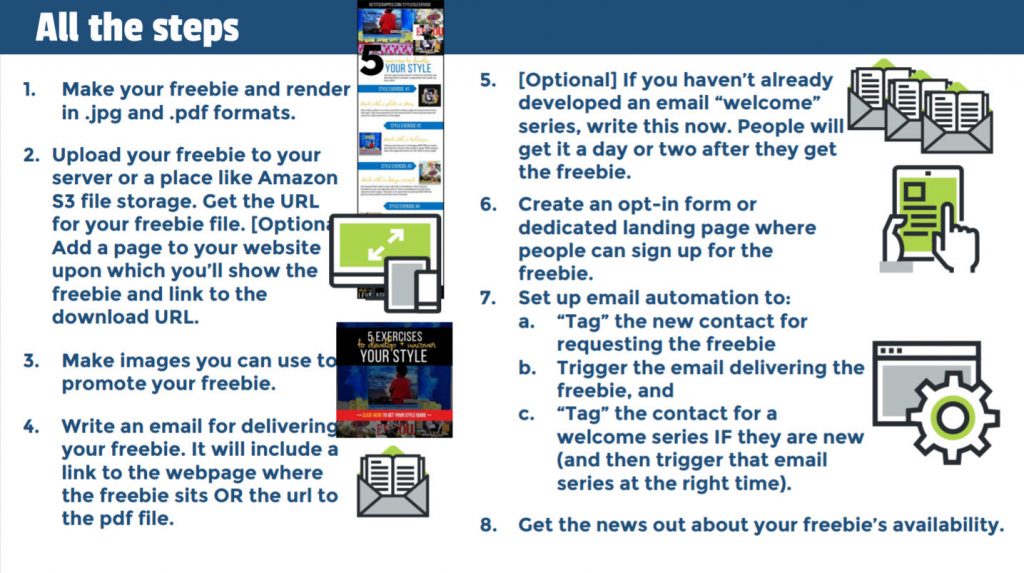
SO HERE IT ALL IS…
This picture summarizes the steps to putting those pieces together.