
Here's why you need to create regular and free content to build an online teaching business
It turns out that in addition to creating those lessons you will sell to your online students . . .
. . . you'll also need to create regular free content.
You need to make this content both to attract new prospects and to nuture those who have aleady found you.
Check out this image of a sales funnel. Your work of selling your course begins (at the top) with sharing free content that creates awareness in your prospects.
What kind of awareness? First: awarenes that they even have a problem (or a desire). Second: awareness that solutions exist to this problem (or desire). Third: awareness that you are someone with a solution they need and want.
So that's the first situtation in which you need free content to share.
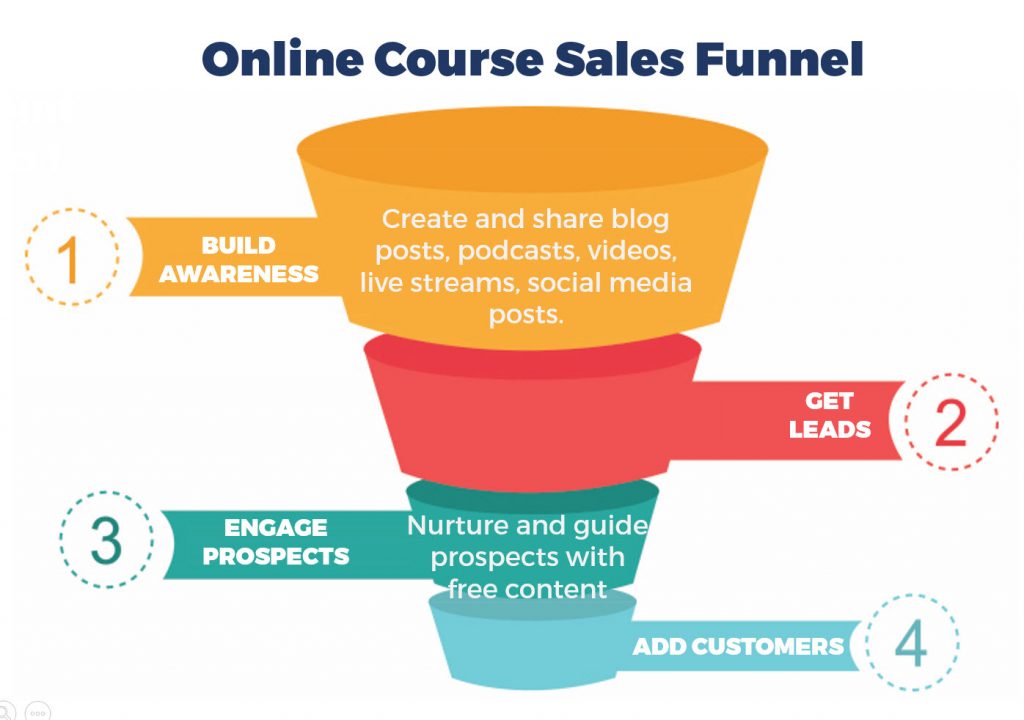
Now, move on down that funnel. See that you'll need to engage and even “nurture” your prospects. It takes a while for them to understand that they want a solution and that yours is in the running.
Again, regular free content is the tool for doing this work.
What is that content and where does it exist?
Your free content should exist on your website (and perhaps other platforms, in addition). You'll also use the creation of new content as a reason to email your list and share news of it. So news of your content exists in your emails.
Ideally you should be creating and sharing news of your content each week.
Each week? Whoa. That's a lot of work, you might be thinking. Or: hey, I still need to create my actual course!
I hear you. But that's the reality.
If you want to develop and maintain your own profitable online teaching business, understand and plan to incorporate the work of creating free content.
Everything gets easier when you have a system
Whether it's figuring out what to create, actually creating, or getting the word out, you'll be more successful and efficent in this work when you ahve a system.
What follows is a process for getting up and running with creating and sharing your own original content regularly. It's going to sound like a whole bunch of work at the beginning–but understand this:
Start with the first week and then the next. Get through 4 weeks, and you can get processes in place that make batching possible and efficient.
So stick with me here!
STEP 1. Choose your primary content format
Your free content will most likely be in one of these formats:
- blog post
- podcast
- recorded video
- live stream video
Think about which platform is best for your content, for your strengths, and for your audience preferences.
If your primary platform is NOT your website (i.e., if it's YouTube or Facebook or LibSyn or something else) you should still create a blog post in which you introduce the topic and embed or link to the other platform.
FOR EXAMPLE:
— when your regular content is podcast episodes. Those podcasts will be published on iTunes, Stitcher and perhaps other podcast distribution networks. In addition, make a blog post to go with the episode. Embed the podcast, and include text that introduces the topic and links to sources referenced. You could even include a transcripts or expanded notes. Be sure to use a clear title that will represent your content well in online searches.
— when your regular content will be how-to videos posted on YouTube. In addition to publishing on YouTube, make a blog post and include an introduction, links to resources, and perhaps even extended notes. You'll also include the video right on the blog post. Again, use a clear, SEO-friendly blog post title. It's best if the YouTube video title and your blog post title are the same.
The point here is: your content may have a platform where it best fits, but you should also present it on your website.
2. Identify 3 to 5 content “pillars”
As you decide exactly what to talk about or write about or demo about, you'll need to think backwards from the courses you're selling and identify the content that people who are good prospects for your courses would like.
What are their interests, competence levels, obstacles and goals as they relate to the class you're teaching?
What would they like to get from you?
Do they need mindset support, technical how-tos, processes, ideas, exposure to other experts, or something else?
Spend time figuring this out. Come up with a big list of brainstormed topic ideas.
And, as you do that, look to identify three to five categories within which those topics fit. Make sure those categories are the right ones to attract good prospects for your course. By that, I mean, be sure this content is in alignment with what you will sell. Make sure you're creating a path for prospects that logically moves them to your paid product.
These categories are your “content pillars.” When you know these pillars, they'll help you brainstorm new content, they'll ensure you cover a variety of topics, and they'll let you organize content within your website.
And one more advantage is this: once you get several pieces created in each category, you can create a landing page that presents descriptions and links to all of these pieces. Done with an eye toward good SEO practices, these can become well-trafficked pages on your website.
Here's an example of content pillars.
At my scrapbooking education website, we publish blog posts every week, and we sell a membership focused on teaching scrapbook design, scrapbook ideas, and visual storytelling.
When I first started the blog 10 years ago, I was including articles on anything that was related to scrapbooking, from photography tips to art journaling ideas to crafty DIYs. A couple years in, though, I realized that people reading crafty DIYs weren't interested in the advanced layout design lessons I was selling.
And that's when we began to better tie free content to paid content. From that came our primary blog content pillars: Layout Design, Scrapbooking Ideas, Scrapbook Page Parts, and Scrapbook Page Storytelling.
Now, each month, we consider those pillars (and our upcoming new paid content) to brainstorm the blog content.
Your assignment in this step is to identify your content pillars.
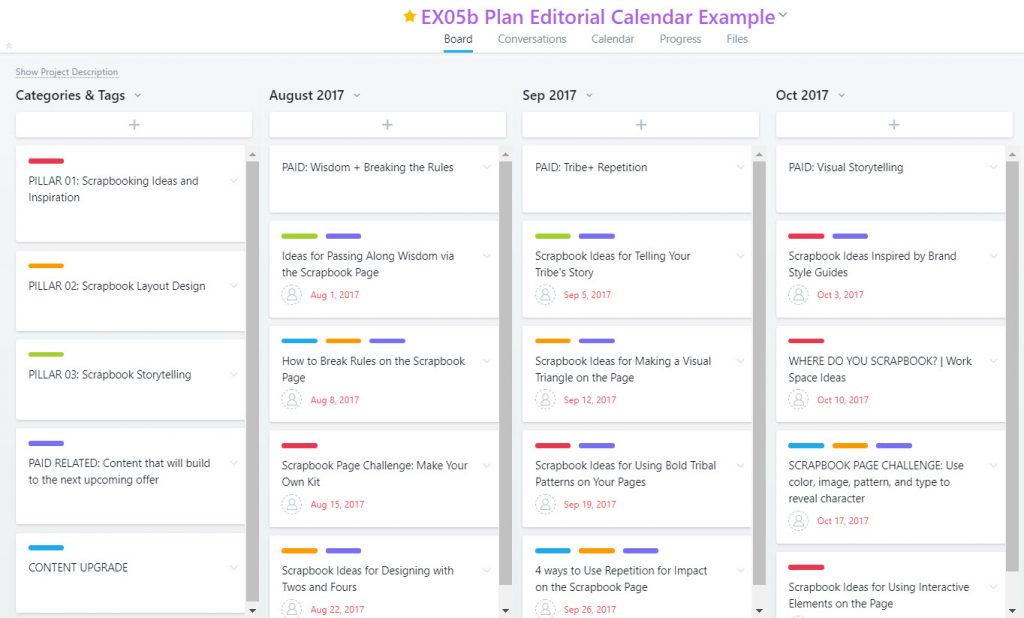
This is planning for Get It Scrapped blog content based on the pillars shown (and color coded) in column 1. Notice that in addition to planning for pillar content, we plan for content related to upcoming paid offers. We also include a “content upgrade” on some posts. Look to the second column and see that artiles match up to the various pillars.
3. Identify 12 upcoming content topics
With your pillars identified, now it's time to brainstorm several pieces you could create for each pillar. You might have come up with them in the last step.
Now it's time to choose 12, looking for a balance across your content pillars, connections to your upcoming paid content offers and even seasonality if it's relevant for your topic.
Later on, you might batch up and work month to month or even in longer stretches. If you're new to this, though, plan out and commit to the first 12 weeks right now. This will help you really get the first work done and create momentum. It will give you a base to work on. And it enables you to make changes if you realize content adjustments are needed.
4. Batch and create at least 4 weekly content pieces
It's going to take discipline and processes to create and present regular content.
When you batch up and create four or five pieces–especially the first time–you'll come to understand the best process for doing this work. You'll know if you need scripts or outlines. You'll know what graphics you need. You'll understand how long it takes to do this work. And you'll see if the topics you've planned really are working out.
HERE'S WHAT THE WORK MIGHT LOOK LIKE:
If you're presenting in live streams, you'll need to prepare for your sessions. In this case, the early work is outlining your presentation, creating any visual supports, and making the blog post that goes with the live stream after the fact. (OR you might decide to write the blog post first and then use that as your outline and reference for the presentation.)
If you're presenting YouTube videos, you'll prep your script or outline and any projects you're showing. And then record and render and schedule for posting on YouTube. You'll also make a corresponding blog post.
If you're creating a Podcast, you'll prep your outline and any guests. Then record, edit, schedule for publication on your podcast service, and create a corresponding blog post.
So get those first 4 pieces (and corresponding website or blog posts) made!
5. Write email and create social shares for each of the first 4 pieces
If you can batch this up, great! If you want to do this part week-by-week right now, then do that.
For each content piece, write an email that introduces the topic and links to your content piece. Aim to tell your email readers something different than what you cover in the content piece. Your goal is to get their interest and to get them to click on over to the content.
The expert writers at CopyHackers say that every email is a sales email. The thing you're selling in these emails is the CLICK and subsequent viewing or reading of your content. It matters. You've gone to all the trouble to create the content: be sure it's consumed.
For each content piece, create social posts to promote the piece. Focus on the platforms where your people spend time. Choose where you'll regularly share for maximum impact and for efficiency. Create a social post appropriate for the platform. By that I mean that it should look like it belongs visually and in the language you use.
Here's an example of the social media posts we'd make to go with one blog post from my scrapbooking website:
- Instagram image that's a peek of one of the scrapbook pages in the article.
- Instagram image that's a quote from the article or the article title laid over an image.
- Facebook group post that asks people a question that relates to the article, shares an image (different from on Instagram) and links to the blog post
- Facebook page post that presents the article with title, excerpt and image pulled from article.
- On Pinterest, we pin the article cover image that has the article title and we pin all of the scrapbook page images from the article.
Note that we would post these on different days and at different times throughout the week.
Get creative with this–and make sure the post you make is right for the social platform where you're sharing, whether that's Pinterest, Twitter, Facebook, Linked-In, Instagram or another platform. Understand that you can share the same content on the same platform multiple times: just come at it from different angles.
Part of this work may be creating images for social media–and for sharing in your email. Creating and scheduling social media posts is something to put at the top of your list for getting help with when you can afford an assistant.
6. Document the process for regular content creation, email, and social media shares
With four pieces created, emailed, and shared on social media, it's time to get your process documented. Look back at the work you've done. Consider how you'd like to do it in the future, and create a checklist of the work to be done.
Include all of the steps and get them into your favorite management tool. I like to use Asana for work like this. Doing that also makes it possible to assign some of the steps to an assistant. It also ensures that when I sit down to work, I know exactly what needs to be done and I can get it done efficiently.
Understand how much time you could save if all of your social media post creation, graphics creation, and scheduling were done at once for several articles. The same goes for editing videos or podcasts.
7. Schedule out batching and production of content for next 4 to 8 weeks
You've got your 12 week plan and 8 weeks left. Now that you have a better idea of what it takes to do the work, get that work onto your calendar, hopefully batching up much of the work.
Set HARD DUE DATES for all of the steps. Meet those due dates.
8. Schedule the work of defining topics to be covered when this 12 weeks is up
Determine how far out you'll work with this content and be sure to schedule the time for brainstorming and committing to content.
Yes. This is major work. But this is how you meet new prospects, and make existing prospects warmer.
I always expect to spend as much time (if not more) marketing my courses as I do creating them.
Creating free content is a part of that work.
And the work gets easier when you commit to creating that content and have it available to share.
So, it's time to dig in:
Take the first step toward choosing your content format, your content pillars, and planning out 12 weeks.
Get the work done week by week at first and then batched as time goes on.
Make this non-negotiable work that has to go onto the calendar. Just as you wouldn't dream of missing a live teaching session for paid students, don't miss creating the content that will let you grow and nurture an audience of future students.